Arduino on atmega8 with internal 8Mhz crystal
Finally after days of tinkering finally got mega8 running on internal oscillator with arduino bootloader.
I use arduino in most of my projects as it has amazing code base and every project imaginable,I have just one arduino board(freeduino) that came with m328p boot-loaded, I found a blog,I forgot the address I just copied the contents in a notepad file, that showed how to make a bare bone atmega 8, atmega 168, and atmega 328p work with arduino bootloader
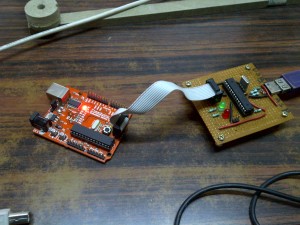
For this you’ll need a arduino board and a AVR ISP programmer( any will do serial, parallel port and usbasp) I have a serial that I got with a kit, parallel port programmer that I made and usb programmer(usbasp) I made recently and a sketch loader that has a FTDI chip, which I use to load sketches on my projects
Follow the link below that you want to make if you don’t have a ISP programmer
How to make Serial port How to make Parallel Port How to make USB programmer
Making a parallel port programmer is the simplest. Base Programming commands(these commands will just read the IC )
Using Serial programmer
sudo avrdude -p atmega8 -P /dev/ttyS0 -c ponyser
```Using Parallel port programmer```
sudo avrdude -p atmega328p -P /dev/parport1 -c frank-stk200
```Using USB programmer```
sudo avrdude -p atmega8 -c usbasp
```To under stand the avrdude command switches visit the excellent post by [ladyada](http://www.ladyada.net/learn/avr/avrdude.html)

So lets get started,

#### Overview of the process

ATmega 8 when bought from any shop will have nothing in the flash memory, we need to unlock the IC , change the fuses , upload the boot-loader and lock it so that we will not erase the boot-loader when a new sketch is uploaded.

First Unlock the IC
avrdude -p atmega8 -c usbasp -U lock:w:0x3f:m
Program the Fuses
avrdude -p atmega8 -c usbasp -U hfuse:w:0xca:m -U lfuse:w:0xdf:m
Upload the bootloader
avrdude -p atmega8 -c usbasp -U flash:w:ATmegaBOOT.hex
Lock the bootloader
avrdude -p atmega8 -b 115200 -U lock:w:0x0f:m
[](/uploads/2013/03/IMG-20130312-00287.jpg)
for fuse values and which boot loader to upload for other IC such as atmega168 or atmega328p refer to the board.txt file in arduino folder(located in hardware/arduino folder if you don't find it just write it in the search box) So when you upload the sketch , select the board whose values you have used from the boards.txt for example I used values of this board so I will select "Arduino NG or older w/ ATmega8" board in arduino IDE
##############################################################
atmega8.name=Arduino NG or older w/ ATmega8
atmega8.upload.protocol=stk500 atmega8.upload.maximum_size=7168 atmega8.upload.speed=19200
atmega8.bootloader.low_fuses=0xdf atmega8.bootloader.high_fuses=0xca atmega8.bootloader.path=atmega8 atmega8.bootloader.file=ATmegaBOOT.hex atmega8.bootloader.unlock_bits=0x3F atmega8.bootloader.lock_bits=0x0F
atmega8.build.mcu=atmega8 atmega8.build.f_cpu=16000000L atmega8.build.core=arduino ############################################################## So now the the IC is loaded with the arduino bootloader but atmega8 is not using its internal oscilator but It will require a 16Mhz external crystal to operate but we need it to work with its internal ocilater,
So we change its H and L fuse settings to following
HFUSE=0xc2 LFUSE=0xe4
but now if we upload the sketch it will not work so we have to create a new board entry
copy the following in the board file
##############################################################
atmega8\_8mhz.name=ATmega8 (8MHz internal OSC)
atmega8\_8mhz.upload.protocol=stk500
atmega8\_8mhz.upload.maximum\_size=7680
atmega8\_8mhz.upload.speed=9600

atmega8\_8mhz.bootloader.low\_fuses=0xe4
atmega8\_8mhz.bootloader.high\_fuses=0xc2
atmega8\_8mhz.bootloader.path=atmega8
atmega8\_8mhz.bootloader.file=ATmegaBOOT.hex
atmega8\_8mhz.bootloader.unlock\_bits=0x3F
atmega8\_8mhz.bootloader.lock\_bits=0x0F

atmega8\_8mhz.build.mcu=atmega8
atmega8\_8mhz.build.f\_cpu=8000000L
atmega8\_8mhz.build.core=arduino
atmega8\_8mhz.build.variant=standard
##############################################################
Now select this board to upload the sketches.

This is very useful for small projects to run the code you just need to supply power and make reset pin high via resistor.
---
### Comments:
####
[nedl]( "[email protected]") - <time datetime="2013-10-02 09:31:00">Oct 3, 2013</time>

Hi! I think you forgot to mention a step in your instructions, I think your method requires that you first place your blank ATmega8 into the arduino, right? Since you seem to just be using the arduino for its 28-pin socket with clock and the ISP header, another way for people who don't already have a programmer is to instead use the Arduino as a programmer and put the blank atmega8 on a breadboard. It would just need a crystal on the correct pins (I believe it's required until you've set the fuses for no crystal) and jumper wires from the Arduino to the ATmega8's power and programming pins. Arduino includes the ArduinoISP example sketch to let you use your already bootloaded 328p in the Arduino as an avrdude-compatible programmer, with instructions for which pins to connect to which programming pins. It's a notoriously flaky sketch, but it's probably an easier method than building a whole new programmer if somebody just wants to burn a bootloader once or twice. Also useful for burning USBasp firmware without having to build an intermediary programmer you only ever use once :) Of course, once you have built a USBasp that's much nicer than an ArduinoISP! Also, I think if you copy your edited flags into your custom atmega8\_8mhz boards.txt entry, you can do the whole set of avrdude commands for unlocking, burning, flag setting, and locking straight from the Arduino GUI, by choosing "Burn Bootloader" under the tools menu. Don't forget to set the correct programmer under tools first, it supports a bunch, including usbasps and also that ArduinoISP sketch. Behind the scenes it just basically runs the same avrdude commands you did. I'm not sure how well it handles a situation where avrdude requires root-level access and you're running the Arduino IDE as a normal user. I think in Linux you might have to add some udev config rules to make the programmer accessible to normal users without having to sudo. I just wanted to comment since I thought your article was pretty neat :). Your article is an especially good way of doing it if you don't have a spare crystal around too, which might be likely when the end result doesn't require one.
<hr />
####
[hemalchevli]( "[email protected]") - <time datetime="2013-10-02 10:19:00">Oct 3, 2013</time>

Thanks, I did indeed missed that step. I'll edit the post asap, At the time of writing this, I used arduino 23, even when 1.0 was out, 23 didn't had usb-asp listed in burn bootloader menu, after I discovered 1.0 supports I always use the method you mentioned above, which saves a lot of hassles. I also add about the udev config rules. Thanks again for the tips :)
<hr />
####
[viagra](http://viagraboomer.com "") - <time datetime="2020-05-30 12:36:35">May 6, 2020</time>

**viagra for sale** viagra 20 mg 8 table name - viagra 20mg coupons password - online canadian pharmacy viagra
<hr />
Archives
Tags